
Today was my classroom Christmas party and what an event it was!
All children wore pajamas to school so they would be extra-cozy for our celebration.
The morning started with the discovery of Santa’s surprise visit overnight. He left a message for our class and instructions for creating reindeer food to revive the animals’ magic and energy during their tiresome trip around the world on Christmas Eve night. Everyone gathered around the table while I read the special instructions from Santa.
My students were so excited by the letter and “Top Secret” recipe that Santa provided! You can help Santa deliver an unexpected overnight visit to your classroom too by downloading Santa’s Super-Special Magic Reindeer Food Kit from my TpT store. The kit includes a Santa letter, recipe printout, and labels for small zipper baggies, and sells for only $1!
Our next task was some fun Christmas crafting! We made ice cream cone Christmas trees. You know the ones I’m talking about… they’ve been all over Pinterest!
The minute I saw this project, I knew it was a perfect craft for my class party. The only issue was transporting the completed trees to the children’s homes without making a mess and without any tears due to broken cones.
After some serious brainstorming, I arrived at the perfect solution!
This is actually an updated image from a much more recent blog post with plenty of great “pinworthy” photos. You definitely want to check out my Frosted Classroom Christmas Party post.
I used clear plastic cups and lids as carrying cases for the completed trees. One of my wonderful crafty mothers drilled a hole in the top of each overturned cup, and rigged a loop of ribbon with a knot inside of the cup to create an adorable carrying case. I love how these trees look like Christmas ornaments!
UPDATE: A year after writing this post, I drilled the holes for the display cups myself and created a photo tutorial of the entire process. Be sure to check out my DIY Cup Case photo tutorial to see how I created these simple cases.
The tree decorating process was very so much fun, and a little preparation ahead of time made for a simple, organized, and germ free decorating party!
Here is my desk with all the decorating supplies laid out and ready to go. On the far left, you can see a few lids pre-labeled with student names. On the right side you can see that each child received a cup and plastic knife with their own portion of frosting. Kids can’t resist licking yummy frosting off their fingers. This way they could lick as much as they wanted and no germs would be shared in the process.
Parent volunteers prepped the project by placing an upside down lid in the center of an empty plate. The plate served at each student’s workspace. A layer of frosting was used as glue to secure a plain cookie onto the center of the upturned cup lid. Another layer of frosting was added on top of the cookie, and the ice cream cone was finally set in place. The cookie and frosting layers helped secure the ice cream cone to a firm base so it wouldn’t wiggle or tip over during the decorating process.
Finally, we were ready to begin.
Each student carefully covered their ice cream cones with frosting.
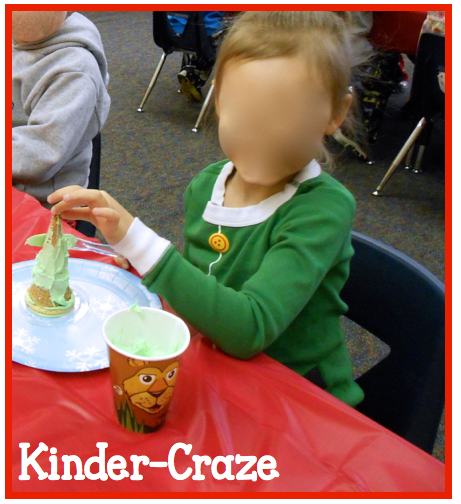
I LOVE the elf pajamas this student wore to school for the party!
 |
After the cones were frosted, it was time to decorate! Small candy pieces were spooned onto each child’s plate (so children could continue to treat themselves to sugary goodness without sharing germs). The kindergarteners transferred candy from the plate onto the frosted tree.
As each child finished decorating his/her Christmas tree, the overturned cups were snapped in place onto the lid and set aside until dismissal. Thanks to the clear cups and lids, we didn’t have a single Christmas tree catastrophe!
Here are a few additional details you may want to know for party preparation:
CUPS – I purchased 20 ounce clear plastic cups and clear lids from Gordon Food Service. Cups and lids are sold separately. They are a little pricey (I spent about $13 on the cups and lids alone, but I have enough left over for next year’s party).
FROSTING – I delegated frosting preparation to a parent in the classroom, but I got the inside scoop from her. For my class of 14 students, 6 containers of white Betty Crocker frosting were prepared. She colored all of it herself the morning of the party (this prevented the frosting from drying, cracking and hardening too early). Once colored, 5 of the containers were scooped into smaller cups for the students The student cups were filled with 2 big table spoonfuls (the kind you eat with, not a measuring spoon) of frosting. The 6th container of frosting was colored and put into a quart-size Ziploc bag. I cut a small hole in the bottom corner of the bag to use it as a pastry bag and squirt a little frosting as glue to anchor the cookie and cone in place.
I have one more Christmas treasure from my classroom to share with you tomorrow. You’ll want to stop by and discover the final piece of my Christmas celebration.
Get ready for Christmas with Kindercraze. Stop by any of my Christmas posts to see more exciting ideas to help you celebrate.
[pt_view id=”6717fef74e”]


I’m a former kindergarten teacher turned work-from-home mom. I still love sharing ideas and resources to make teaching easier, so you can focus on what really matters in the classroom. When I’m not working on the blog, you’ll find me chasing kids around the house with a cold cup of coffee in my hand (some things never change even once you’re out of the classroom!)

©2021 Kinder Craze. All Rights Reserved.

13 Responses
We did these trees this year also and they were a HIT. But I really love the idea of the carrying case and LOVE the cute twizzler garland!! I’m adding both of those next year 🙂
Danielle
Thank you Danielle! I was so pleased with the finished product!
Another great idea!! I made sugar cone trees last year and sent them home in a not-as-clever way… I am def. pinning this for next year!! Where did you get the cups with lids?
❤Teri
A Cupcake for the Teacher
I love the way you sent the trees home, great idea
Terri
Thefirstgradeprincess.blogspot.com
Thank you Terri! I’m sure the parents loved it even more than I did 🙂
The cup idea is brilliant!
❀ Tammy
Forever in First
Thank you Tammy!
These trees came out so cute. Love the clever way of transporting them. Where did you find the clear cups and lids, and do you know what ounce size they are? I would love to do this with my kinders next year; about how much icing/containers of icing does it take for a class of about 20-22 kids, and did you color the icing yourself or were you able to buy it already green?
Thank you again for sharing!
I promise to look at my supplies over break and I will keep you posted!
Great! Thank you so much! Hoping you have a Merry Christmas Day!
Hi Maria- hope you had a great Christmas break and got the New Year off with a bang! While its still on my mind- I was just checking back with you about the cone Christmas trees you did with your class. I was wondering about how much icing does it take for a class of approximately 20-22? And was your icing dyed green already or did you dye it yourself? Last, where did you find the clear cups with lids? And what size are they? Just wanted to write this all down in my “idea” journal so that I can try it next year.
Thank you,
Pam
I just updated the post with answers to all of your great questions! Thank you so much for stopping by once again!
Ahhh- thank you. I will go back and check them out! Thanks again for doing that. You are so organized 🙂