

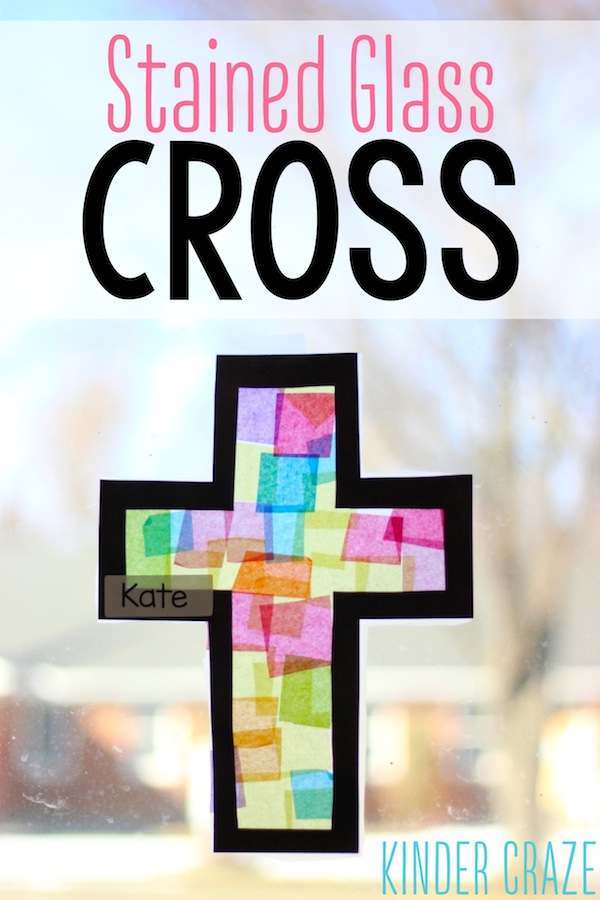
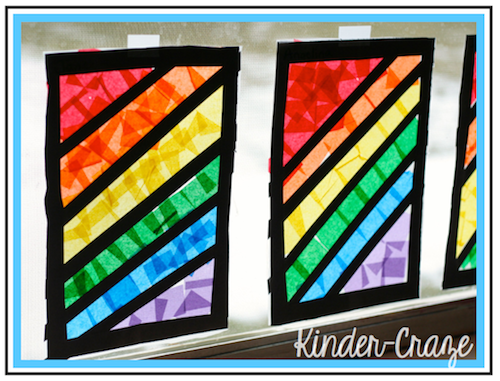
Today my students made “stained glass” crosses to display in the windows. The crosses are perfect for Lent and the bright colors are perfect for SPRING! I have lots of bright colors in my classroom and these crosses were the perfect addition.

The best thing about this project is that it’s a quickie to create in class and it’s relatively mess free. No glue needed!
UPDATE: I recently wrote an updated blog post with more details, measurements for creating a cross template, and updated photos. Click here to read the full post.
Want to make it in your own classroom? Here’s what you need to do:
Old file folder (to create a cross template)
1 sheet of 9″x12″ construction paper in a BRIGHT color per student
2 sheets of contact paper per student (at least 9″x12″ in size)
lots of tissue paper squares in BRIGHT colors (1 to 2″ in size)
Scissors
Permanent marker
I used a file folder to create a cross template. Easy to make: Fold the folder in half “hot dog” style, draw half of cross, cut out, and you’re ready to go. My template has a border that is about 3/4″ wide.

Folding the pieces of construction paper in half “hot dog” style. Trace 1/2 the cross onto the paper. Make sure you are tracing along the fold so the cross will stay connected when it is cut out. You will need to keep the paper folded in half to cut out the cross. If you teach kinders, DO THIS STEP FOR YOUR STUDENTS.
You can do this one yourself or leave this task to the students. After receiving very careful instructions, my kids did it in class and it was an experience! Great opportunity to teach the importance of following directions. Some children had an easy time. Others had lots of pieces when they were finished. We made it work. If your time is limited, you have a challenging class, or you just don’t want a headache, let a volunteer cut out the crosses.

Peel the contact paper and place it sticky side up on the table. CENTER THE CROSS ON THE CONTACT PAPER FOR YOUR STUDENTS. If this kids attempt this one themselves, you will end up with a lot of wrinkly, folded crosses stuck to a wad of contact paper. Kinders are great at turning a clean sheet of contact paper into a wad!

Now the fun part. Let students fill in the cross with the tissue paper squares. Have them avoid touching the actual contact paper. Some will, but the fewer kids with contact paper stuck to their hands, the better off you will be!

Use the 2nd sheet of contact paper to “seal” the cross together. This step is optional, but I don’t like to have loose pieces of tissue paper blown off by the wind. The simplest way to do this (and avoid wrinkles in the paper) is to place the new sheet of contact paper sticky side up, then flip the cross page onto it.

Use a sharpie to label the “front” side of the cross with the student’s name. (Note that the back side has tissue paper overlapping the frame)
Use scissors to cut excess contact paper from edges and crosses are ready to hang.
And just like that, the projects are finished and ready to display.
Looking for more window decoration projects? Click any of the links below to see my other stained glass creations that I’ve made with my kinders. They look beautiful on the windows and are very fun to make!
[pt_view id=”19630a91a8″]

I’m a former kindergarten teacher turned work-from-home mom. I still love sharing ideas and resources to make teaching easier, so you can focus on what really matters in the classroom. When I’m not working on the blog, you’ll find me chasing kids around the house with a cold cup of coffee in my hand (some things never change even once you’re out of the classroom!)

12 Responses
Love these! I’ll think I’ll try to make them with my kids this week so they are ready for an Easter bulletin board. Thanks for sharing!
I have big windows in my classroom and these will look beautiful! Thanks for all your wonderful ideas, especially the faith based ones!
This is a wonderful idea and so easy. Thank you
Hi! I love this craft idea! When I did my test run, at first it was perfect. But after it sat a while, the top contact paper peeled up from the bottom one.
Anyone else have this problem?
Thank you!
Lisa
Hi Lisa! That occasionally happens to me. I sometimes use a piece of Scotch tape around the edges to keep the contact paper in place after it starts to peel up.
We made this craft in my Sunday School class and it worked out great! Instead of using Contact paper, I placed the first cross into a laminating sleeve, let the kiddos fill in the cross with tissue paper, carefully placed the second cross on top, closed the sleeve and ran it through the laminator. Since we did not have enough time, I did not trim the extra lamination off.
Hi, I love this idea but I don’t have any contact paper.
What could I do to substitute it?
Wax paper?
Any ideas?
Do you have a small laminator at home? It would also work with laminating sheets. And ironing wax paper is a great idea, but the wax might get into your iron. If you go that route, but a few sheets of regular paper between the wax paper and your iron (also between the wax paper and your ironing board).
Thank you for this great art idea for the season of Lent. We made them in our kindergarten class and used a laminator instead of the contact paper. They look beautiful.