
You know how much I love to experiment with my classroom decor and to create my own items that don’t look like they came direct from the local teacher store. This year my birthday board was no exception. I found some adorable crowns from Creative Teaching Press that coordinated with my classroom colors. One of the crowns became a part of the “Happy Birthday” sign on the board. Add a few student photos, colorful cardstock and a few items printed on my classroom computer and Voila! A fun, student-oriented birthday board with plenty of bright colors. You can download my printables for FREE and create a matching birthday board in your own classroom.
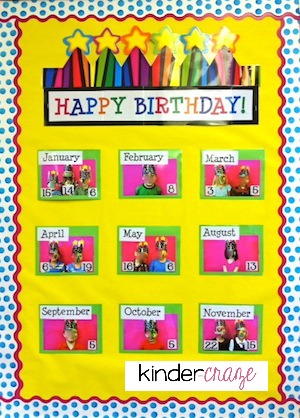
Yes, I know 3 months are missing from my birthday board. My class is small (only 15 students) and I don’t have any birthdays in June, July, or December. Those months were not included on my board this year.

These Royal Crowns by Creative Teaching Press serve as the header on my birthday board. I created a banner that can be trimmed and mounted on black paper (I used black cardstock to prevent fading). Once mounted on black paper, the entire banner was trimmed once more to match the length of a headband and all pieces were attached with a glue stick.
This board is all about my students, so I grouped students by birth month and snapped a photo of each birthday group for the board. I wanted the background to be an enhancement to the birthday board, so I placed each group in front of a large sheet of magenta Fadeless Paper (of course I selected a color that was already featured in my classroom decor.) I then had all photos developed into 4×6″ prints.
My student photos needed a little extra embellishment to really pop on the bulletin board. All photos were mounted onto the same color cardstock to prevent the bulletin board from looking too busy. The crown is fun and busy enough by itself – all other details needed to be simple. I started by mounting each photo onto a 6×7″ sheet of lime green cardstock – being careful to leave ample space at the top.
Next, all photo cards were labeled with the corresponding birth month. These were printed on plain white paper and trimmed to fit. I wanted to keep things interesting, so the labels were placed in the upper-left corner of each photo card.
Finally, I added each child’s birthDAY to the photos. These were printed on Avery 5163 address labels – the labels were trimmed and placed near each student’s torso in the photos. I considered printing signs of some sort for the students to hold, but label stickers just seemed so much simpler.
I ran all my birthday board components through the laminator – the HAPPY BIRTHDAY header and all photo cards. Once the pieces were trimmed, they were ready to be arranged onto the bulletin board. I just love how it all came together.
 Create Your Own Birthday Board with a FREEBIE!
Happy Un-Birthday to You! Let’s celebrate with a really great FREEBIE. The download includes a PDF to print my “Happy Birthday” sign, the names of each month, and labels for each date. The date labels can be printed on white paper and trimmed, but I used Avery Labels #5163. Trimming is still required, but it’s SO much simpler. Click to start downloading and enjoy the FREEBIE!

I’m a former kindergarten teacher turned work-from-home mom. I still love sharing ideas and resources to make teaching easier, so you can focus on what really matters in the classroom. When I’m not working on the blog, you’ll find me chasing kids around the house with a cold cup of coffee in my hand (some things never change even once you’re out of the classroom!)