

These days, it seems as though the whole world loves to play Words with Friends and Scrabble. What better way to capitalize on students’ interest than by incorporating a fun theme into the classroom decor!
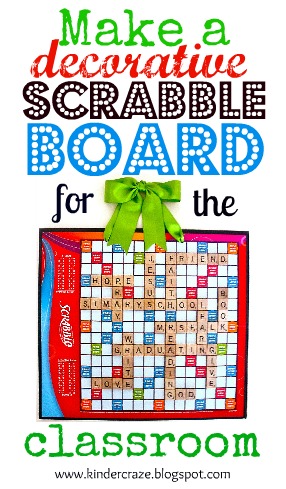
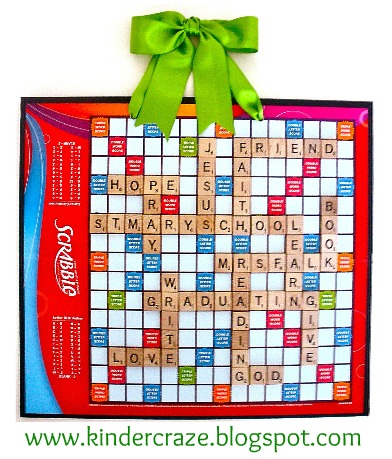
This fun and easy DIY project is a Scrabble board with the letters arranged into school-themed words and permanently glued into place. With the addition of some ribbon, the completed board can be mounted on a wall to provide a personal touch in a very trendy way.
Now I know what you’re thinking – “Scrabble isn’t exactly an age-appropriate game for Kindergarten.” And you are correct. Which is why I didn’t make a Scrabble board for myself. Instead, I crafted a board as a gift for an 8th Grade teacher at my school. Her students actually have Scrabble tournaments in class, so I knew this would be a perfect addition to her classroom. So, if you’re an early elementary teacher (like me) you may need to pass this idea along to all your friends in the upper grades. Now that we have that cleared up, are you ready for the directions? Me too! Ok, here goes…
For this project you will need:
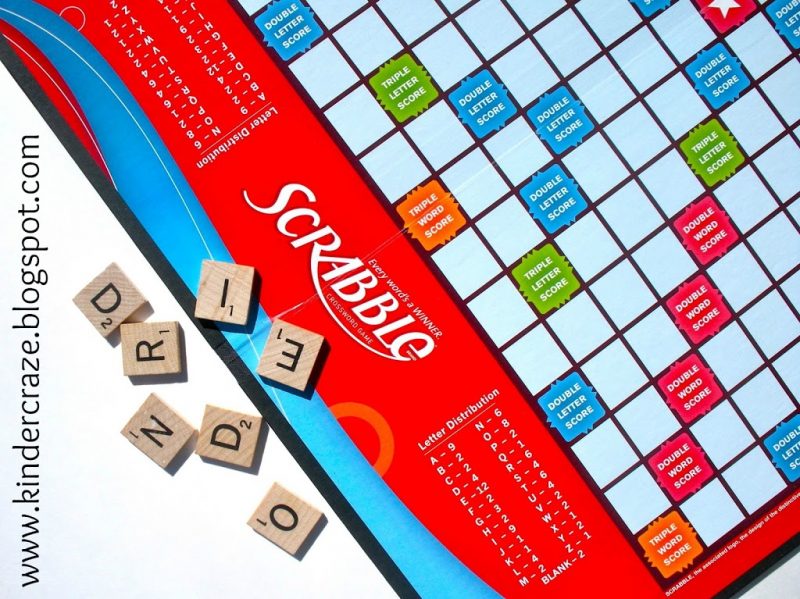
Make a list of potential words to include in the project and begin to arrange them on the board. If you only use the letters provided in one scrabble game, careful planning is essential. You only receive 2 Fs and 2 Cs. You’d be surprised at how important those letters can be! I kept my board in harmony with Scrabble rules by connecting each word and making sure one of my words occupied the center square of the board where the pink star is located. Just an FYI – I teach in a Catholic school so many faith-based words have been included in this classroom sign – not all of these words would not be appropriate for a public school classroom.
As you plan, be mindful of balance (it looks best if your words span across the entire board without too many gathered in one little section). It’s also important that you place a word with several letters across the center seam of the book. Later, when the letters are glued down, it will be the ones in the center that keep the board firmly opened without wobbling.
This is the fun part! Use durable craft glue to glue each letter into place. Place a small dot of glue onto the back of the pieces or onto the squares they will occupy on the board. I used Aleene’s Quck Dry Tacky Glue and it was great. It provided enough time for me to fuss with any crooked tiles and began to firm up within 5 minutes. It also provided a very firm bond without any of the strings that hot glue leaves behind. Once all tiles are glued, allow several hours for the glue to set.

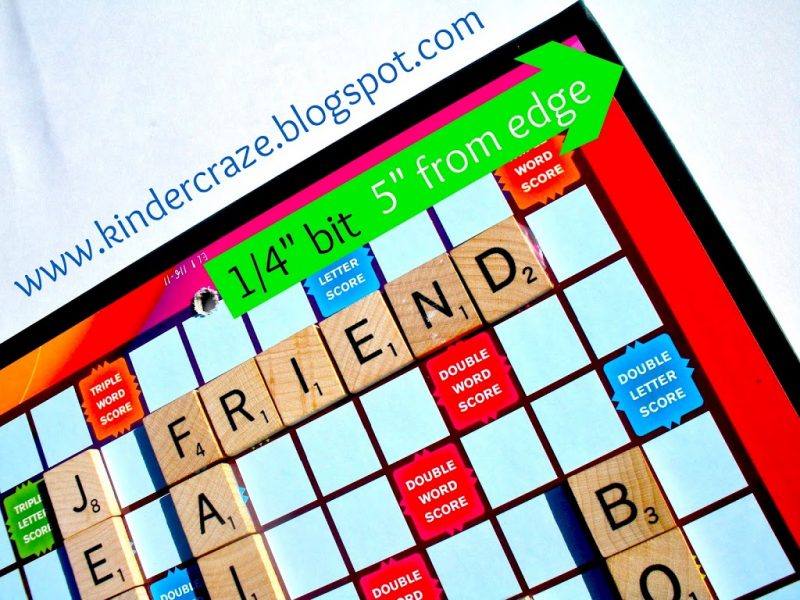
Use a cordless drill with a 1/4″ drill bit to drill two holes into the top of the board (for hanging) after the letters have dried completely. I placed my holes 5″ in from each side along the top of the playing area.
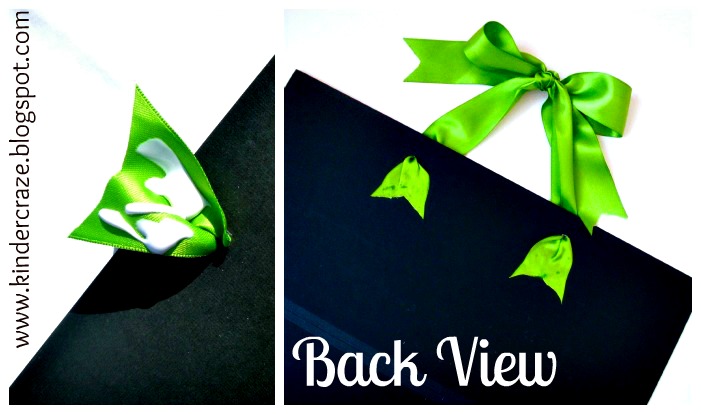
You will need 2 pieces of ribbon to put the finishing touches on this project. I started by using a piece that was 15″ long. Push each end of the ribbon through the front of the two drilled holes along the top of the game board. It’s a bit of a tight fit, but I twisted each end was able to pull them through without a problem.
This creates a hanging loop on the front side of the board and allows you to glue the ribbon ends to the back of the board where they will be out out of sight. Gluing the ends is easy. Just place a generous amount of glue on each ribbon tab, then affix the tabs to the back of the board.
As a final touch, place a 30″ piece of ribbon through the hanging loop you created and tie it into a bow. Trim the ends to an attractive length. Allow the glue to dry completely before displaying your new classroom sign.
I decorated my board using only the letter tiles included in the Scrabble board. If you need extra tiles, they can be purchased directly from Hasbro or through Amazon. The Hasbro tiles are cheaper (only about $5.00) and will include the exact same quantity of each letter that you would find in a Scrabble game. Unfortunately, you need to allow 6-8 weeks for delivery.
Letter tiles can also be purchased through Amazon. They cost more ($10.00) but ship much sooner. Please note that tiles stocked at Amazon are for craft purposes – basically the same tiles but not the same quantities of each tile that would be found in an official Scrabble game (for example, you may get fewer Es but more Ns.)
Do you think you’ll make a classroom sign using the new Scrabble board style or the old-school style with tans, teal, and red?
PS- As much as I would love to take credit for this fun DIY classroom decoration, it wasn’t all my idea. My best friend gave a similar board to me as a birthday gift several years ago. I recently stumbled upon her creation and thought that it would be a fun touch to the classroom.
PS again- I’m linking up with Monday Made It at 4th Grade Frolics. Today’s linky already has 115 fabulous DIY project ideas. Come check it out!

I’m a former kindergarten teacher turned work-from-home mom. I still love sharing ideas and resources to make teaching easier, so you can focus on what really matters in the classroom. When I’m not working on the blog, you’ll find me chasing kids around the house with a cold cup of coffee in my hand (some things never change even once you’re out of the classroom!)

10 Responses
This is an adorable idea!! I may try to find the old school scrabble board. I love it!
Lisa
Learning Is Something to Treasure
Thanks Lisa! I love the old school look too. It was a toss up for which one to create!
Oh my goodness! That turned out great, Maria! I love the idea. I especially like that you put the teacher’s name. This would be a great teacher appreciation gift to make. 🙂
Sarah
Miss A’s Kindergarten
Thanks Sarah. It never occurred to me but YES it WOULD make a great teacher appreciation gift!
Maria! How cute is this!!! So many gift possibilities as well as classroom ones:) Thanks bunches for sharing and for linking up:)
4th Grade Frolics
I know- I love how the Scrabble board makes for a great gift. Thanks for hosting such a fun linky!
What a great idea! Thanks so much for sharing! I would love to have you link up to my “Blogs of Inspiration” page. By the way, I am a new follower and can’t wait to read more.
Happy Teaching,
Laura
TIPS: Teach, Inspire, and Prepare Students
Hi Laura, I’m so glad you like my Scrabble board idea! I stopped by your blog and I’m your newest follower!
Wow, what a fantastic idea! I love it – I’m sure your friend will, too.
Kara
Spedventures
wow! what a great job..i do love it, its very awesome..i find your blog very interesting and i have gained a lot of ideas. thanks a lot for sharing
cheat on scrabble