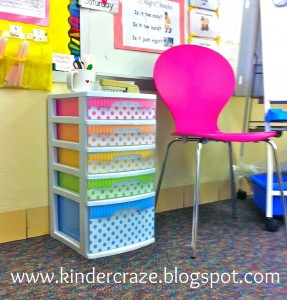
At the end of May, I shared my post on how to Fancy Up Your Sterlite Drawers and the comments and questions keep rolling in. Apparently, people just LOVE fancy Sterlite Bins.
The big question from visitors was “would it work if you used Mod Podge?” I did not have an answer to this question at the time. In fact, I deliberately chose not to use it the first time around because I had my doubts about how well the Mod Podge would seal to the slick plastic surface of the drawers. But, since everyone was dying to know about the Mod Podge, I decided to decorate another set of bins and give it a try!
This time I made some helpful videos to guide you through the process (including easy template instructions!) You will also want to check my FAQs at the bottom of this post for any additional questions you may have.
This video is the biggie. It answers all of your Mod Podge questions, guides you through the process of decorating the bins, and includes instructions for creating an easy template out of wax paper!
Now that you are well-informed on how to decorate your Sterlite drawers, you may still be debating between tape or Mod Podge. Each medium has it’s own set of advantages and disadvantages. Tape is great for the inexperienced. Mod Podge is trickier but more durable. This video offers a bit more insight as you consider how to proceed.
For Mod Podging: I recently decided to coat the inside of my Mod Podge drawers with clear acrylic spray. It will help to ensure a better seal so those papers don’t pop up later. It should also help those bins to tolerate the humidity better.
For Taping: Here’s a great idea from a Facebook follower: laminate your scrapbook paper first, then trim and tape it into the bins. It’s the best of both worlds!
Where did you get that pink chair?

What kind of paper did you use to line the drawers?
I always uses scrapbook paper. All of my papers (the bright polka dots & stripes as well as the fun purple papers) came from the same collection of scrapbook papers from Hobby Lobby. They sell the product online with a different cover but the same SKU# as my paper set.
Can you please provide a template online to print and download?
As much as I would love to do this for you, there are simply too many styles and sizes of Sterlite bins on the market for me to meet this need. Fortunately, a viewer provided a great tip for making templates using wax paper. It is so much easier than creating a template by awkwardly trying to trace the old-fashioned way (the way I did for my original blog post!) You’ll want to watch the video to see how much easier it is with wax paper.
So, what adhesive do you think YOU will use to Fancy Up your Sterlite drawers?
PS-I decided to Link up with 4th Grade Frolics for Monday Made It. There are hundreds of great DIY ideas in this weekly Linky. Stop by and check it out!


I’m a former kindergarten teacher turned work-from-home mom. I still love sharing ideas and resources to make teaching easier, so you can focus on what really matters in the classroom. When I’m not working on the blog, you’ll find me chasing kids around the house with a cold cup of coffee in my hand (some things never change even once you’re out of the classroom!)

©2021 Kinder Craze. All Rights Reserved.

67 Responses
I loved how you made these drawers when you showed them a few months back! Thanks for giving us some video tutorials to go with them. It is definitely on my to do list! 🙂
Lisa
Learning Is Something to Treasure
You’re so welcome! Best of luck with you fancy yours up 🙂
They are so cute! I wonder about using Duck Tape? Hmmm…
❤Firstgradebloomabilities❤
Duck tape would be fun- it’s used for everything else these days!
Hi Maria! Have you thought about laminating the paper with clear contact or even a regular laminator before applying the tape to protect the paper…. You could laminate just the back so it doesn’t glare on the front just a thought haven’t tried it at all
SO cute! I think I may be trying this with a set of drawers this year. What about using double sided tape? worth a try, I may try it myself. 🙂
I just got through doing this with 3 sterilite bins of different sizes. I used Mod Podge. It was a bear! I only did the fronts. I used wrapping paper. Not so easy to work with–tears easily. But I’ve got 4 rolls of it, so I’m using it on everything–bins, bookcases, signs, etc. I’ll feel guilty if I don’t use it now that I’ve bought it. I’ve got at least one more sterilite bin to do, and two more bookcases. I feel like all I’ve done lately is Mod Podge!
http://mrsbrowndotcom.blogspot.com
Wrapping paper would be so tough to do on those drawers. Wow, you are dedicated. I’m pretty sure I would have thrown the wrapping paper away by now. I’m sure all of your matching classroom containers are beautiful!
Back in the 1970’s when decoupage was all the rage, before we did the cutting-out, we were taught to spray the prints (wrapping paper, napkins, whatever) with acrylic. Not only did it make it stronger, when we applied glue and then finished with lacquer, acrylic, or ModPodge, the paper would not wrinkle. I see people talking about bubbles and wrinkles today but it’s an easy fix. Spray just the front.
I watched your two videos! I think that I’d probably just do the double sided tape. It’s really humid here and I’d rather not take the risk. I do really like the laminating idea! Maybe that would work well. Thanks for testing it out for us. Great job! BTW, there’s a super cute purple rolly chair on Big Lots that I’m dying to buy now…so thanks! 🙂
Sarah
Miss A’s Kindergarten
I’ve considered double-sided tape, but I suspect that even the clear tape will show through the bins in some way. I’d be interested to hear how it turns out!
Thanks for making your videos I can’t wait to get started on my bins!! I am going to do the tape bc I have never used mod podge. Thanks again!!
You’re welcome and good luck!
Thanks for sharing this. Can’t wait to spruce mine up!
Brandi
Success in Second Grade
Thanks so much for sharing this tutorial. I just did my first modge lodge project on clipboards. I am a new follower.
Pamela
First Class Teacher
I just love mod podge. I checked out your clip boards-they are too cute. I’m your newest follower too!
Thanks so much for sharing this tutorial. I just did my first modge lodge project on clipboards. I am a new follower.
Pamela
First Class Teacher
fancy drawers! too cute 🙂
Ohhh I love these!! I am going to have to try this in my classroom!!
Thanks for sharing 🙂
Yessssss. Just found you through Pinterest. LOVE this idea! So smart! Thanks! 🙂
Cait
Sliding into First!
So glad you linked up! I have seen your pin all over the blog world. Love that you did a video tutorial:) That turned out so cute:) Thanks for linking up and hope you can come back next week:)
4th Grade Frolics
Thanks Tara. Your linky is great and I was thrilled to link up!
How about using spray adhesive after you have cut your decorative paper?
Spray adhesive would work great, but it would be difficult to slide the paper into the front section of the drawer after it has been sprayed.
Thank you for the tutorial! I need that visual hook up!
~Natalie
You’re so welcome! Glad to help!
I have tons of these drawers and need to fancy them up! Thanks for the tips. I’m your newest follower.
Amanda
Teaching Maddeness
Come join my linky party!
Hello Amanda and welcome! I’m thrilled to have you as a follower!
This is wonderful! I also became your newest follower! I am doing a small giveaway–but I would love to have you come by and visit.
http://www.ateacherwithoutaclass.com
This is so helpful and fabulous. I love the help. Thanks for sharing.
Jill
Bubbalulu.blogspot.com
I love this idea so much! I’m going to be doing it myself and will be mentioning it in my blog with a link back to you. Thanks for the great tutorials to go with it!
Shibahn
http://www.landoflearning.wordpress.com
I’m so thrilled to hear that these tutorials have been helpful to everyone that has commented! I would love to see the finished results if you Fancy Up for yourself!
I am your newest follower! I’ve started a K blog and have been searching for ways to decorate my classroom using polka dots! This is so stinkin’ cute! I’ve added a link from a recent blog post to your page! Thanks for the cute idea and the amazing instructions! mrsseitzkblog.blogspot.com – hope you stop by my blog & become a follower 🙂
Sarah
Hi Sarah,
I’m so glad you stopped by and thank you for adding a link to Kinder-Craze on your own blog post! I noticed that you are considering wrapping paper. I’ve never tried it, but someone else commented on a previous post that it was very affordable but much more tedious because wrapping paper rips so easily. Either way, I’m so thrilled that you like the project!
I saw a lady do hers with the template then she cut a thin cardboard of the shape and next a decrative paper then she used glue stick to glue the pretty paper onto the cardboard and then slid it into place. I don’t think she used tape to secure it because the ridge in the front of the drawer held it into place. She didn’t do the back and sides however. The card board was from an old gift box or cereal box that was re-purposed.
That sounds brilliant!
Hi, Maria. I love your tutorials. When I first saw your original post, I was inspired to try it but had a lot of issues. First, my bins were wider than the scrapbook paper, so I was having to piece things together across the front. Second, I could not get the pieces to fit around the handle, especially with trying to piece it together. Eventually, after spending a lot of frustrating time and wasting paper, I just decided to use contact paper and duct tape. lol! They are much more forgiving for a beginning crafter like myself. I have pictures here. http://killenglish.blogspot.com/2012/07/sterilite-drawers-re-do.html Thanks so much for the great idea!!
I stopped by your page, and the finished product looks great. The bright duct tape really pops!
Has anyone tried this using material instead of paper?
Not that I have heard, but I would love to see the finished product with fabric.
Just tried this using spray adhesive! Worked very well! I would deffinately recommend it!
That’s great news! Thanks for sharing!
You Rock Maria! Thank you!!!
Thanks Karen!
Thank you for the tutorial. Very helpful to see a visual presentation of the project. I’m off to do my drawers for tomorrow’s first day of school.
Good luck Vicky! I hope they turned out well!
Thank you Maria for the videos. I am definitely working on dressing mine up this week. I just posted a link on my blog to your videos. I know others will find them just as helpful as I did. I am also a new follower 🙂
http://hedrichshive.blogspot.com/
Thanks for the shout-out on your blog Antoinette! Now I’m a new follower of yours 🙂
Thanks for the tutorials. I’m going to give some drawers a facelift for our temporary nursery until we get moved and can get him set up with real furniture. I’m definitely going with the tape only because I’ll be able to change it and use it for other things later on. Thanks again!
You’re welcome Leah! A nursery, huh? Sounds like congratulations are in order. Congrats!
Im deaf and a teacher for the deaf.. your video isnt captioned, and I need instructions on how to use the mod podge with the paper for the drawers. Thanks.
am wondering about a spray adhesive being less fussy than mod podge to work with…has anyone tried this? and if so how well did it work as far as a good “stick”?
am wondering about a spray adhesive being less fussy than mod podge to work with…has anyone tried this? and if so how well did it work as far as a good “stick”?
am wondering about a spray adhesive being less fussy than mod podge to work with…has anyone tried this? and if so how well did it work as far as a good “stick”?
Loving this post!! Planning on doing this to two sets that I have to have out in my room! Such a smart idea”
Loving this post!! Planning on doing this to two sets that I have to have out in my room! Such a smart idea”
thanks for share...
Maria, Has anyone thought of doing the outside of the drawers with modge podge?? Just thinking the stuff inside wouldn’t damage the paper and if it is modge podged it should stay. Just wondering, why the inside???
Thank you so much for posting this! I was thinking about this as a first mod podge project, but I think I’ll be laminating and taping now! 🙂
So cute!! Makes me want to go out and buy more drawers for my room..and make another trip to hobby lobby!
Thanks! This is a very helpful video! I’m going to do the same thing for the little bins with lots of drawers!
I’m at school so I haven’t watched the video yet, but can you tell me how you get the residue that gets left on the bins after you pull the stickers off, off?
What a great tutorial video. One of the best I’ve seen in a long time. I have so many sterlite drawers and I’ve been wanting to line them for ages. Now that I’ve watched your video I’m raring to go. Thanks so much!
I love this! Thank you so much for this tutorial! My bins turned out so cute! Instead of tape, I used glue dots, the process went a lot faster!
I need to do this for my office!!! So adorable!
Has anyone attempted to create some downloadable templates? I know there’s lots of models of drawers but if someone gathered stenciles submitted from others, then it could work! If anyone is interested in helping or even just submitting yours, email me!